

Arts and crafts for kids are a wonderful way to encourage creativity, imagination, and hands-on learning. From colorful paper flowers to rock painting and recycled bottle crafts, these activities keep children entertained while developing essential skills. Whether you’re looking for simple indoor projects, classroom activities, or fun weekend ideas, these 20 easy arts and crafts help kids explore their creativity using affordable, everyday materials.
1. Paper Plate Animal Crafts

Paper Plate Animal Crafts are fun and creative activities that allow kids to transform ordinary paper plates into colorful animal faces. Children can make lions, pandas, rabbits, bears, and other favorite animals using paint, construction paper, and simple craft supplies. This hands-on activity encourages imagination, artistic expression, and fine motor development. It is perfect for preschoolers, kindergarten students, and elementary school children looking for easy and affordable arts and crafts projects.
Materials Needed
- Paper Plates: For creating different animal faces.
- Colored Construction Paper: For making ears, noses, and other features.
- Washable Paint: For adding colors to the animals.
- Paintbrushes: For painting and decorating plates.
- Child-Safe Scissors: For cutting paper shapes.
- Non-Toxic Glue: For attaching animal features.
- Markers: For drawing eyes, mouths, and whiskers.
How to Make Paper Plate Animal Crafts
Start by choosing an animal, such as a lion, rabbit, or panda. Give each child a paper plate and encourage them to paint it using colors that match their chosen animal.Allow the paint to dry completely before adding facial features. Cut ears, noses, and other shapes from construction paper and attach them with glue.
Use markers to draw eyes, mouths, whiskers, and additional details. For a lion, children can attach strips of orange paper around the plate to create a mane.Display the finished animal faces on a wall or use them for imaginative storytelling activities.
Learning Benefits
Paper Plate Animal Crafts help children develop creativity, color recognition, and fine motor skills. Cutting, painting, and gluing improve hand-eye coordination and concentration. The activity also encourages children to recognize different animals, explore facial features, and practice imaginative storytelling.
2. DIY Paper Flowers

DIY Paper Flowers are colorful and creative arts and crafts activities that allow kids to make beautiful flowers using simple paper materials. Children can create roses, daisies, tulips, sunflowers, and other decorative flowers with construction paper, glue, and scissors. This hands-on project encourages imagination, color recognition, and artistic expression while improving fine motor skills. It is perfect for preschoolers, elementary school students, classroom decorations, and homemade gifts for family members.
Materials Needed
- Colored Construction Paper: For creating colorful flower petals.
- Green Paper: For making stems and leaves.
- Child-Safe Scissors: For cutting flower shapes.
- Non-Toxic Glue: For attaching petals and stems.
- Pencils: For drawing flower patterns.
- Markers: For adding decorative details.
- Craft Sticks: For supporting finished paper flowers.
How to Make DIY Paper Flowers
Start by choosing a flower design, such as a daisy or tulip. Draw several petal shapes on colored construction paper and carefully cut them out.Arrange the petals in a circular pattern and glue them together around a small paper circle to create the flower’s center.
Cut a long strip of green paper or use a craft stick to make the stem. Attach green paper leaves to complete the flower.Encourage children to experiment with different colors, petal shapes, and flower sizes. Arrange the finished flowers in a handmade paper bouquet or use them to decorate greeting cards.
Learning Benefits
Making paper flowers helps children develop creativity, hand-eye coordination, and fine motor skills. Cutting and arranging petals improves concentration and spatial awareness. The activity also encourages color recognition, pattern-making, and an appreciation for nature and different flower shapes.
3. Toilet Paper Roll Animals

Toilet Paper Roll Animals are fun and eco-friendly arts and crafts projects that turn empty cardboard tubes into adorable animal characters. Children can create elephants, lions, owls, rabbits, and other animals using recycled toilet paper rolls, colorful paper, and basic craft supplies. This activity encourages creativity, imaginative play, and environmental awareness while teaching kids the importance of reusing everyday materials. It is ideal for preschoolers, elementary school children, and budget-friendly indoor craft sessions.
Materials Needed
- Empty Cardboard Rolls: For creating animal bodies.
- Colored Construction Paper: For making ears, tails, and other features.
- Washable Paint: For decorating cardboard tubes.
- Paintbrushes: For applying different colors.
- Child-Safe Scissors: For cutting paper shapes.
- Non-Toxic Glue: For attaching animal features.
- Markers: For drawing eyes, noses, and mouths.
How to Make Toilet Paper Roll Animals
Begin by selecting an animal that children want to create. Paint an empty cardboard tube using a suitable color, such as brown for a bear, gray for an elephant, or yellow for a lion.Allow the paint to dry completely. Cut animal ears, tails, wings, or trunks from construction paper and attach them to the cardboard tube using glue.
Use markers to draw facial features and add details such as stripes, spots, or whiskers.Encourage children to create several different animals and arrange them into a miniature zoo or jungle scene.They can also use their finished animal figures for storytelling and imaginative play.
Learning Benefits
Toilet Paper Roll Animals encourage creativity, problem-solving, and fine motor development. Children learn to recognize animal features, colors, and shapes while practicing cutting, painting, and assembling materials. Reusing cardboard tubes also introduces environmental awareness and the importance of recycling.
4. Handprint Art Painting

Handprint Art Painting is a fun and creative arts and crafts activity that allows kids to turn their handprints into colorful artwork. Children can create butterflies, trees, flowers, birds, and other imaginative designs using washable paint and paper. This hands-on project encourages artistic expression, sensory exploration, and creativity while helping kids discover different colors and shapes. It is perfect for toddlers, preschoolers, and elementary school children who enjoy simple painting activities.
Materials Needed
- Washable Paint: For creating colorful handprints.
- White Drawing Paper: For making handprint artwork.
- Paintbrushes: For applying paint to children’s hands.
- Paper Plates: For holding different paint colors.
- Markers: For adding eyes, wings, and decorative details.
- Wet Wipes: For cleaning hands after painting.
- Protective Table Cover: For keeping the workspace clean.
How to Make Handprint Art Painting
Start by choosing a simple design, such as a butterfly, tree, or flower. Pour small amounts of washable paint onto a paper plate.Help children apply paint evenly to their palms and fingers using a soft paintbrush. Gently press their painted hands onto a sheet of paper to create clear handprints.
Allow the paint to dry before adding details with markers. For example, two colorful handprints can become butterfly wings, while green handprints can represent tree leaves.Encourage children to experiment with different colors and hand positions to create unique artwork.
Learning Benefits
Handprint painting develops creativity, sensory awareness, and color recognition. Children improve hand-eye coordination while experimenting with shapes and patterns. The activity also encourages self-expression and helps younger children understand how different hand movements create artistic designs.
5. Popsicle Stick Crafts

Popsicle Stick Crafts are easy and affordable arts and crafts projects that allow kids to create colorful objects using wooden craft sticks. Children can build miniature houses, picture frames, animals, airplanes, and decorative shapes with simple materials. This hands-on activity encourages creativity, construction skills, and imaginative play while helping children explore basic shapes and structures. It is suitable for preschoolers, elementary school students, and classroom craft sessions.
Materials Needed
- Popsicle Sticks: For building different craft structures.
- Non-Toxic Glue: For attaching wooden sticks together.
- Washable Paint: For decorating finished crafts.
- Paintbrushes: For applying colors and patterns.
- Colored Paper: For adding decorative elements.
- Markers: For drawing details and designs.
- Stickers: For personalizing craft projects.
How to Make Popsicle Stick Crafts
Begin by selecting a simple project, such as a miniature house or picture frame. Arrange several popsicle sticks on a flat surface to create the basic shape.For a picture frame, place four sticks in a square and glue their overlapping ends together. Allow the glue to dry before decorating the frame.
Children can paint the sticks using bright colors and add stickers or paper decorations. Attach a small photograph or drawing behind the completed frame.For more challenging projects, encourage children to experiment with building small bridges, fences, or decorative houses using additional sticks.
Learning Benefits
Popsicle stick crafts improve fine motor coordination, creativity, and spatial awareness. Children practice arranging shapes, following instructions, and constructing simple objects. The activity also develops patience, concentration, and problem-solving skills while introducing basic engineering concepts.
6. DIY Friendship Bracelets

DIY Friendship Bracelets are colorful and enjoyable arts and crafts activities that teach kids how to create handmade jewelry using embroidery thread, yarn, or beads. Children can experiment with different color combinations, simple knots, and decorative patterns to design bracelets for themselves or their friends. This creative project encourages patience, concentration, and artistic expression while teaching children the value of friendship and sharing. It is especially suitable for elementary school children and older kids.
Materials Needed
- Embroidery Thread: For creating colorful bracelet patterns.
- Colorful Yarn: For making simple braided bracelets.
- Child-Safe Scissors: For cutting threads.
- Tape: For securing threads while working.
- Clipboard: For holding bracelet materials in place.
- Large Beads: Optional decorations for bracelet designs.
- Ruler: For measuring thread lengths.
How to Make DIY Friendship Bracelets
Start by choosing three or more embroidery thread colors. Cut equal lengths of thread, approximately 18–24 inches long, depending on the bracelet design and wrist size.Tie the threads together at one end and secure the knot to a table using tape or a clipboard.
Separate the threads and begin braiding them into a simple pattern. Move the outer threads toward the center, alternating sides to create an even braid.Continue until the bracelet is long enough to fit comfortably around the child’s wrist. Tie a knot at the end to secure the design.Encourage children to experiment with different colors and create matching bracelets for their friends.
Learning Benefits
Friendship bracelet making strengthens fine motor skills, hand-eye coordination, and concentration. Children learn about patterns, sequencing, and color combinations while practicing patience and following instructions. Creating bracelets for friends also encourages generosity, social interaction, and meaningful creative expression.
7. Rock Painting Art

Rock Painting Art is a fun and affordable arts and crafts activity that allows kids to transform ordinary stones into colorful masterpieces. Children can paint animals, flowers, rainbows, insects, and imaginative characters on smooth rocks using washable paints and markers. This hands-on activity encourages creativity, patience, and artistic expression while helping children explore colors, patterns, and textures. It is perfect for preschoolers, elementary school students, and creative indoor or outdoor craft sessions.
Materials Needed
- Smooth Rocks: Clean stones of different sizes and shapes.
- Acrylic Paint: For creating colorful designs.
- Paintbrushes: For painting patterns and details.
- Paint Markers: For drawing small decorative features.
- Paper Towels: For cleaning brushes and removing excess paint.
- Water Cup: For rinsing paintbrushes.
- Protective Table Cover: For keeping the workspace clean.
How to Make Rock Painting Art
Begin by collecting smooth rocks and washing them thoroughly to remove dirt. Allow the rocks to dry completely before painting.Encourage children to choose simple designs, such as ladybugs, butterflies, flowers, or smiling faces. Apply a base coat of paint to each rock and let it dry.
Use smaller paintbrushes or paint markers to add eyes, patterns, stripes, and other details.Children can experiment with different colors and designs to create a collection of painted rocks.Display the finished artwork in a decorative bowl, on a shelf, or in a garden.
Learning Benefits
Rock painting develops creativity, fine motor skills, and hand-eye coordination. Children practice recognizing colors, exploring textures, and creating patterns. This activity also encourages patience, concentration, and imaginative thinking while allowing kids to express their personalities through artwork.
8. Paper Bag Puppets

Paper Bag Puppets are entertaining arts and crafts projects that allow kids to create their own characters using ordinary paper lunch bags. Children can design animals, imaginary creatures, superheroes, or storybook characters with construction paper, markers, and glue. Once completed, these handmade puppets can be used for storytelling, puppet shows, and imaginative play. This simple activity encourages creativity, communication, and artistic expression while developing fine motor skills.
Materials Needed
- Paper Lunch Bags: For creating puppet bodies.
- Colored Construction Paper: For making facial features and decorations.
- Washable Markers: For drawing eyes, mouths, and patterns.
- Non-Toxic Glue: For attaching paper decorations.
- Child-Safe Scissors: For cutting different shapes.
- Yarn: For creating puppet hair.
- Stickers: For adding decorative details.
How to Make Paper Bag Puppets
Start by placing a paper lunch bag on a flat surface with its folded bottom facing upward. The folded section will become the puppet’s movable mouth.Encourage children to choose a character, such as a rabbit, lion, monster, or favorite storybook animal.
Cut ears, noses, eyes, and other features from construction paper. Attach these pieces to the folded section of the paper bag using glue.Use markers to draw additional details and decorate the puppet’s body. Add yarn for hair or paper strips for whiskers.Once the glue dries, children can place their hands inside the bags and move the puppets while telling stories.
Learning Benefits
Making paper bag puppets develops creativity, storytelling abilities, and communication skills. Children improve fine motor coordination through cutting, drawing, and gluing. Puppet play also encourages imagination, emotional expression, cooperation, and confidence when speaking in front of others.
9. DIY Rainbow Craft

DIY Rainbow Craft is a colorful and educational arts and crafts activity that helps children explore the beautiful colors of a rainbow. Kids can create rainbow decorations using construction paper, cotton balls, paint, and other simple materials. This cheerful project encourages creativity, color recognition, and artistic expression while introducing children to basic weather concepts. It is especially suitable for preschoolers, kindergarten students, and elementary school children who enjoy bright and imaginative craft projects.
Materials Needed
- Colored Construction Paper: Red, orange, yellow, green, blue, indigo, and violet.
- White Cotton Balls: For creating fluffy clouds.
- Non-Toxic Glue: For attaching rainbow pieces.
- Child-Safe Scissors: For cutting colorful paper strips.
- White Cardboard: For creating a sturdy background.
- Pencil: For drawing rainbow outlines.
- Markers: For adding decorative details.
How to Make a DIY Rainbow Craft
Begin by drawing a large rainbow outline on a sheet of white cardboard. Help children cut curved strips of construction paper in different rainbow colors.Arrange the colored strips in the traditional rainbow order, beginning with red on the outside and ending with violet on the inside.
Glue each paper strip onto the cardboard, following the curved outline. Encourage children to align the strips carefully to create a neat rainbow shape.Attach cotton balls to both ends of the rainbow to represent fluffy white clouds.Allow the glue to dry completely before displaying the finished rainbow artwork on a wall or classroom bulletin board.
Learning Benefits
DIY Rainbow Craft helps children identify colors, recognize patterns, and practice sequencing skills. Cutting and arranging paper strips strengthen fine motor coordination and concentration. The activity also introduces basic weather concepts and encourages children to observe rainbows in nature.
10. Tissue Paper Butterfly Craft
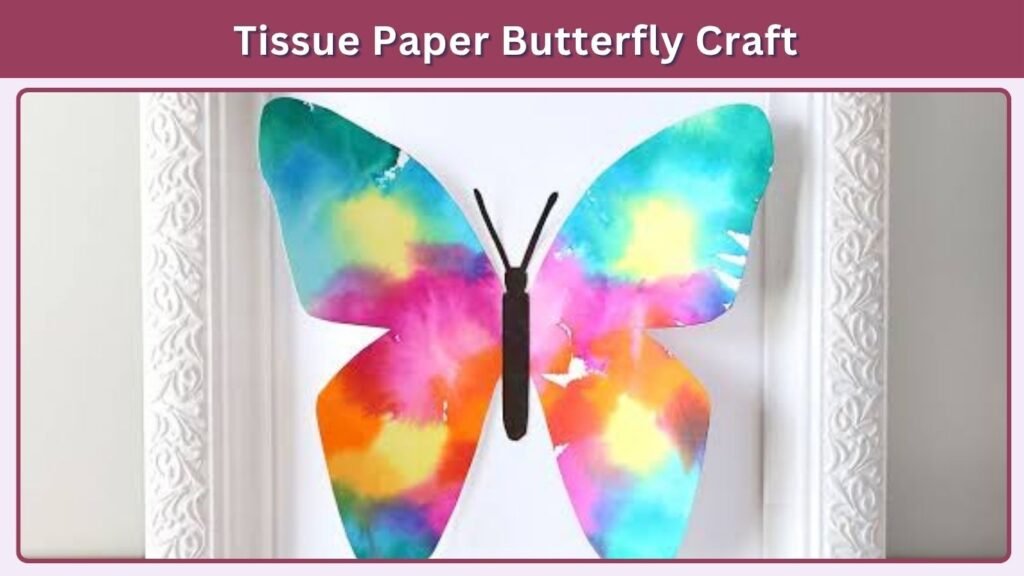
Tissue Paper Butterfly Craft is a colorful and creative arts and crafts activity that allows kids to make beautiful butterflies using soft tissue paper and simple household materials. Children can experiment with bright colors, different wing patterns, and decorative designs to create their own butterfly artwork. This hands-on project encourages imagination, color recognition, and fine motor development. It is perfect for preschoolers, kindergarten students, and elementary school children who enjoy nature-inspired crafts.
Materials Needed
- Colored Tissue Paper: For creating colorful butterfly wings.
- Wooden Clothespins: For making butterfly bodies.
- Pipe Cleaners: For creating butterfly antennae.
- Washable Markers: For decorating the clothespins.
- Non-Toxic Glue: For attaching decorations.
- Child-Safe Scissors: For trimming tissue paper.
- Stickers: For adding decorative patterns.
How to Make Tissue Paper Butterflies
Start by selecting two or three colors of tissue paper. Stack the sheets together and cut them into rectangular shapes.Gently gather the tissue paper in the middle to create two butterfly wings. Secure the gathered center using a wooden clothespin.
Decorate the clothespin with markers to represent the butterfly’s body. Bend a pipe cleaner into two antennae and attach it to the top of the clothespin.Carefully spread the tissue paper to create full, colorful wings. Children can make several butterflies and display them on a classroom wall or decorative board.
Learning Benefits
Making tissue paper butterflies helps children develop creativity, fine motor skills, and hand-eye coordination. Folding and arranging delicate materials improve concentration and patience. The activity also encourages color recognition, pattern-making, and an interest in butterflies and the natural world.
11. Salt Dough Ornaments

Salt Dough Ornaments are fun and affordable arts and crafts projects that allow kids to create decorative shapes using simple kitchen ingredients. Children can make stars, hearts, flowers, animals, and holiday decorations with homemade salt dough. Once the ornaments are completely dry, they can be painted and decorated with colorful designs. This hands-on activity encourages creativity, sensory exploration, and artistic expression while helping children learn basic measuring and shaping skills.
Materials Needed
- All-Purpose Flour: Two cups for preparing the dough.
- Table Salt: One cup for creating firm ornaments.
- Water: Approximately three-quarters of a cup.
- Mixing Bowl: For combining ingredients.
- Rolling Pin: For flattening the dough.
- Cookie Cutters: For making different ornament shapes.
- Washable Paint: For decorating finished ornaments.
How to Make Salt Dough Ornaments
Begin by mixing flour and salt in a large bowl. Slowly add water while stirring until a soft, workable dough forms.Knead the dough until smooth, then roll it onto a lightly floured surface. Use cookie cutters to create stars, hearts, animals, or other decorative shapes.
Make a small hole near the top of each ornament if it will be hung later.Place the ornaments on a baking tray and let an adult dry them in a low-temperature oven at approximately 200°F (93°C) until completely firm. Drying time depends on thickness.Once cooled, children can paint the ornaments and add colorful decorations.
Learning Benefits
Salt dough crafting develops creativity, hand strength, and fine motor coordination. Children practice measuring ingredients, shaping objects, and recognizing different patterns. The activity also introduces simple concepts about textures, moisture, and how materials change during drying.
12. DIY Paper Lanterns

DIY Paper Lanterns are colorful arts and crafts activities that teach kids how to transform ordinary construction paper into beautiful hanging decorations. Children can create lanterns using paper strips, simple folds, and decorative patterns. These handmade decorations are perfect for classroom displays, birthday parties, festivals, and bedroom decorations. The activity encourages creativity, concentration, and fine motor skills while introducing children to basic paper-folding and three-dimensional construction techniques.
Materials Needed
- Colored Construction Paper: For creating lantern bodies.
- Child-Safe Scissors: For cutting paper strips.
- Non-Toxic Glue: For securing lantern edges.
- Ruler: For measuring and drawing straight lines.
- Pencil: For marking cutting guides.
- Ribbon or String: For hanging finished lanterns.
- Stickers: For adding colorful decorations.
How to Make DIY Paper Lanterns
Start by choosing a rectangular sheet of construction paper. Fold the paper in half lengthwise, bringing the longer edges together.Draw evenly spaced vertical lines starting from the folded edge, stopping approximately one inch before the open edge.
Carefully cut along the marked lines. Unfold the paper and gently curve it into a cylinder, bringing the shorter edges together.Secure the overlapping edges using glue or tape. The cut sections will spread outward to create the lantern’s decorative shape.Attach a narrow paper strip to the top as a handle. Encourage children to decorate their lanterns with stickers, patterns, or colorful drawings.
Learning Benefits
Making paper lanterns helps children develop fine motor coordination, spatial awareness, and creativity. Measuring, folding, and cutting paper improve concentration and hand-eye coordination. This activity also introduces basic geometry concepts, including shapes, symmetry, and three-dimensional structures.
13. Cardboard Castle Craft

Cardboard Castle Craft is a fun and imaginative arts and crafts activity that allows kids to build their own miniature castles using recycled cardboard boxes. Children can design towers, walls, gates, and colorful flags while creating a magical kingdom for their favorite toy characters. This hands-on project encourages creativity, problem-solving, and basic construction skills. It is perfect for preschoolers, elementary school children, and indoor craft sessions that combine artistic expression with imaginative play.
Materials Needed
- Cardboard Boxes: For creating the castle walls and main structure.
- Cardboard Tubes: For building tall castle towers.
- Colored Construction Paper: For making flags and decorations.
- Non-Toxic Glue: For attaching cardboard pieces.
- Child-Safe Scissors: For cutting paper decorations.
- Washable Paint: For decorating the castle.
- Markers: For drawing windows, doors, and stone patterns.
How to Make a Cardboard Castle
Begin by selecting a medium-sized cardboard box to serve as the main castle building. An adult should cut a large doorway and several windows into the cardboard.Attach cardboard tubes to the corners to create castle towers. Make pointed tower roofs using cones of construction paper.
Encourage children to paint the castle gray, brown, or another creative color. Draw stone patterns, windows, and decorative details using markers.Add small paper flags to the towers and create a drawbridge using an extra piece of cardboard.Once completed, children can use toy figures to create imaginary adventures inside their handmade castle.
Learning Benefits
Building a cardboard castle develops creativity, spatial awareness, and problem-solving skills. Children practice planning, assembling structures, and recognizing geometric shapes. The activity also improves hand-eye coordination and fine motor development while encouraging imaginative storytelling and cooperative play.
14. Nature Leaf Printing
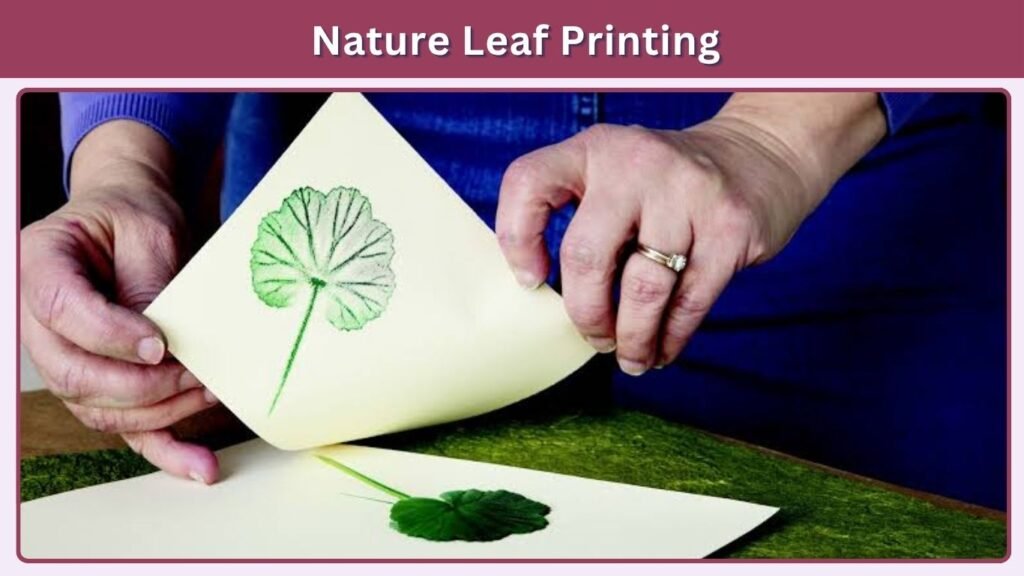
Nature Leaf Printing is a simple and creative arts and crafts activity that allows kids to explore the natural world through colorful artwork. Children can collect different leaves and use paint to transfer their beautiful shapes, veins, and textures onto paper. This hands-on project encourages observation, creativity, and appreciation for nature while teaching children about plant structures. It is an excellent activity for preschoolers, kindergarten students, and elementary school children who enjoy outdoor exploration and artistic activities.
Materials Needed
- Fresh Leaves: Different shapes and sizes for printing.
- Washable Paint: Various colors for creating leaf impressions.
- White Drawing Paper: For displaying leaf prints.
- Paintbrushes: For applying paint to leaves.
- Paper Plates: For holding different paint colors.
- Paper Towels: For cleaning excess paint.
- Protective Table Cover: For keeping the workspace clean.
How to Make Nature Leaf Prints
Start by collecting several clean leaves with interesting shapes and visible veins. Choose leaves from safe, familiar plants and gently wipe away any dirt.Place a leaf on a flat surface with its underside facing upward. Apply a thin, even layer of washable paint using a paintbrush.
Carefully turn the painted leaf over and press it onto a sheet of white paper. Gently press across the surface to transfer the leaf pattern.Lift the leaf slowly to reveal its colorful impression. Repeat the process using different leaves and paint colors.Allow the finished artwork to dry before displaying it or using it to decorate greeting cards.
Learning Benefits
Nature Leaf Printing helps children develop observational skills, creativity, and fine motor coordination. Comparing leaf shapes and textures encourages curiosity about plants and the environment. The activity also teaches color recognition, pattern-making, and basic concepts about leaf structure.
15. Cotton Ball Cloud Craft
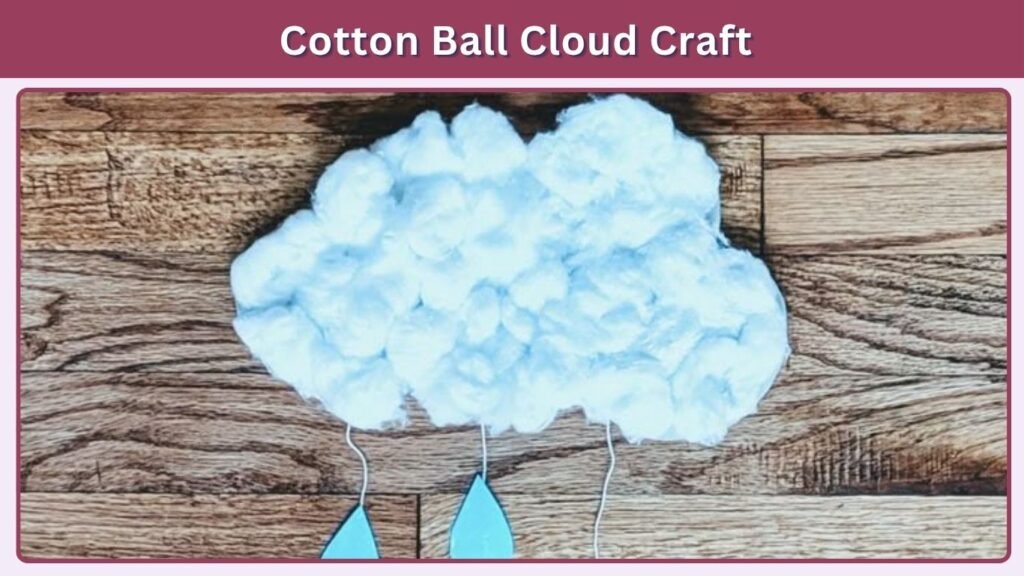
Cotton Ball Cloud Craft is an easy and enjoyable arts and crafts activity that helps kids create fluffy cloud artwork using soft cotton balls and colorful paper. Children can design sunny skies, rainy clouds, rainbows, or imaginative weather scenes with simple craft materials. This sensory-friendly project encourages creativity, texture exploration, and color recognition while introducing basic weather concepts. It is particularly suitable for toddlers under close supervision, preschoolers, and elementary school children.
Materials Needed
- Cotton Balls: For creating soft, fluffy clouds.
- Blue Construction Paper: For representing the sky.
- Non-Toxic Glue: For attaching cotton balls.
- Colored Paper: For creating raindrops, rainbows, and sunshine.
- Child-Safe Scissors: For cutting decorative shapes.
- Washable Markers: For drawing weather details.
- Paintbrushes: For adding color to the artwork.
How to Make a Cotton Ball Cloud Craft
Begin by placing a sheet of blue construction paper on a flat surface. Encourage children to imagine a weather scene they would like to create.Apply small amounts of glue to the areas where the clouds will appear. Gently pull apart cotton balls to create fluffy shapes and press them onto the glued sections.
For a rainy scene, cut blue paper into small raindrop shapes and attach them beneath the clouds.Children can also add a yellow paper sun, colorful rainbow strips, or small birds using construction paper.Allow the glue to dry completely before displaying the finished cloud artwork on a wall or classroom board.
Learning Benefits
Cotton Ball Cloud Craft encourages creativity, sensory exploration, and fine motor development. Children practice recognizing colors, shapes, and different textures while arranging materials. The activity also introduces basic weather concepts, including clouds, rain, and sunshine, through enjoyable hands-on learning.
16. DIY Dream Catcher

DIY Dream Catcher is a fun and creative arts and crafts activity that allows kids to make beautiful hanging decorations using yarn, colorful beads, and simple craft materials. Children can experiment with different patterns, colors, and textures while designing their own dream catchers. This hands-on activity encourages imagination, patience, and artistic expression while developing fine motor skills. It is ideal for elementary school children, classroom craft projects, and creative activities at home.
Materials Needed
- Cardboard Ring: For creating the dream catcher’s circular frame.
- Colorful Yarn: For wrapping the frame and making patterns.
- Large Beads: For adding decorative details.
- Craft Feathers: For decorating the bottom.
- Non-Toxic Glue: For securing decorations.
- Child-Safe Scissors: For cutting yarn.
- Ribbon: For hanging the finished craft.
How to Make a DIY Dream Catcher
Start by cutting a large ring from sturdy cardboard. An adult can prepare the ring for younger children.Wrap colorful yarn around the cardboard ring until the surface is completely covered. Secure the ends with a small amount of glue.
Next, stretch pieces of yarn across the center of the ring to create a web-like pattern. Children can experiment with different crossing patterns and colors.Attach ribbons, large beads, or craft feathers to the bottom of the ring. Add a loop of yarn at the top for hanging.Once completed, display the dream catcher on a bedroom wall or classroom craft board.
Learning Benefits
Making a dream catcher improves fine motor skills, hand-eye coordination, and concentration. Children practice creating patterns, choosing colors, and following instructions. The activity can also introduce the cultural significance of traditional dream catchers in Ojibwe communities and encourage respectful learning about Indigenous crafts.
17. Egg Carton Flower Craft
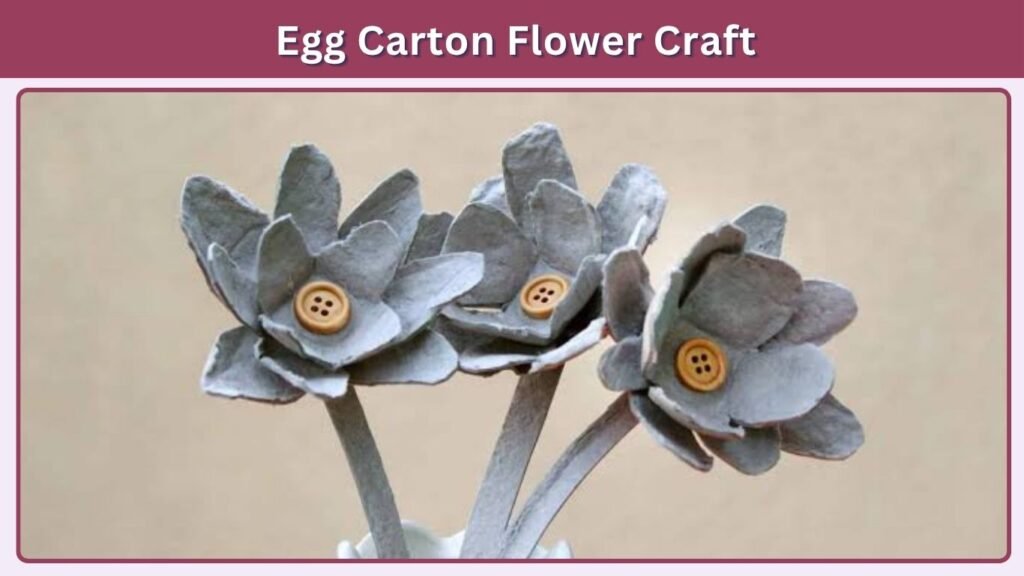
Egg Carton Flower Craft is a colorful and eco-friendly arts and crafts activity that transforms empty egg cartons into beautiful handmade flowers. Children can cut, paint, and decorate individual carton sections to create roses, daisies, tulips, and other imaginative flowers. This simple project encourages creativity, recycling awareness, and artistic expression while improving fine motor coordination. It is perfect for preschoolers, elementary school students, and affordable classroom craft activities.
Materials Needed
- Empty Egg Cartons: For creating flower petals.
- Washable Paint: For decorating flowers.
- Paintbrushes: For applying colorful designs.
- Green Craft Sticks: For making flower stems.
- Non-Toxic Glue: For attaching flower pieces.
- Child-Safe Scissors: For cutting paper decorations.
- Colored Construction Paper: For creating leaves.
How to Make Egg Carton Flowers
Begin by selecting a clean, dry cardboard egg carton. An adult should cut the individual egg cups apart to create separate flower bases.Trim the edges of each cup into rounded or pointed petal shapes. Children can then paint the cups using bright colors such as pink, yellow, red, and purple.
Allow the paint to dry completely before attaching green craft sticks to the back of the flowers.Cut leaf shapes from green construction paper and glue them onto the stems.Encourage children to create several flowers with different colors and petal designs. Arrange the finished flowers in a small decorative container to make a handmade bouquet.
Learning Benefits
Egg carton flower crafts develop creativity, fine motor skills, and hand-eye coordination. Children practice recognizing colors, cutting shapes, and assembling materials. The activity also teaches the importance of recycling and reusing household items while encouraging appreciation for flowers and nature.
18. Paper Mache Animal Craft
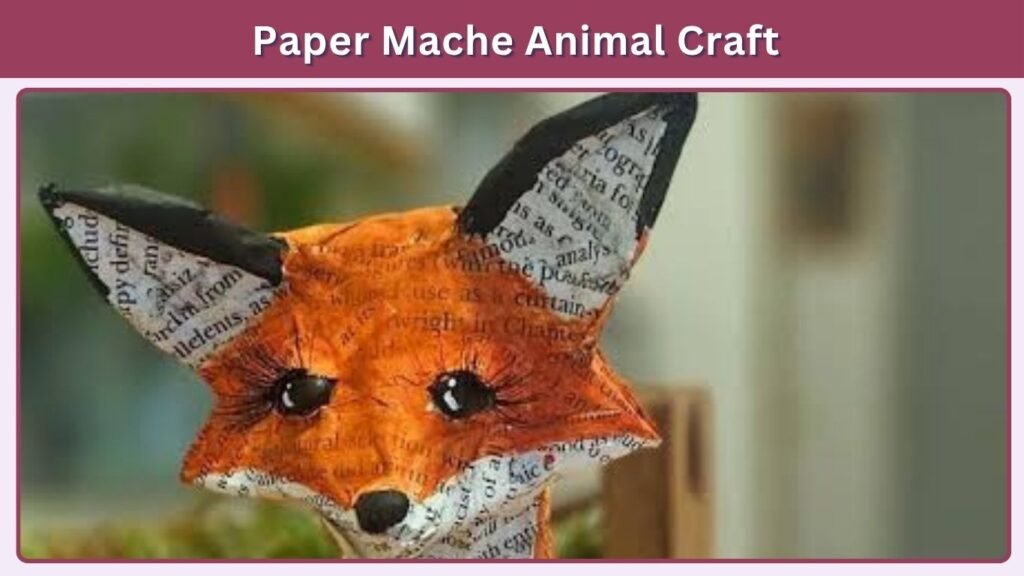
Paper Mache Animal Craft is an exciting arts and crafts activity that allows kids to create three-dimensional animal figures using paper, paste, and simple household materials. Children can design elephants, turtles, cats, birds, or imaginary creatures while experimenting with shapes and textures. This hands-on project encourages creativity, patience, and problem-solving while introducing basic sculpting techniques. It is especially suitable for elementary school children who enjoy building and decorating handmade art projects.
Materials Needed
- Old Newspapers: For creating paper mache layers.
- Flour and Water: For preparing homemade paste.
- Cardboard: For building animal shapes.
- Masking Tape: For securing the structure.
- Washable Paint: For decorating finished animals.
- Paintbrushes: For applying colors and patterns.
- Non-Toxic Glue: For attaching additional decorations.
How to Make Paper Mache Animals
Start by choosing an animal, such as a turtle or elephant. Create its basic body shape using crumpled newspaper and cardboard, securing the pieces with masking tape.Mix flour and water in a bowl until a smooth paste forms. Tear newspaper into narrow strips and dip each strip into the paste.
Place the strips over the animal structure, overlapping them to cover the surface. Add several thin layers to create a sturdy shape.Allow the paper mache to dry completely, which may take one or two days depending on thickness and humidity.Once dry, children can paint their animals and add eyes, patterns, or other decorative features.
Learning Benefits
Paper mache animal crafts strengthen creativity, spatial awareness, and fine motor coordination. Children practice shaping materials, following instructions, and developing three-dimensional structures. The activity also encourages patience, artistic expression, and problem-solving while helping kids recognize different animal features.
19. DIY Photo Frame Decorating
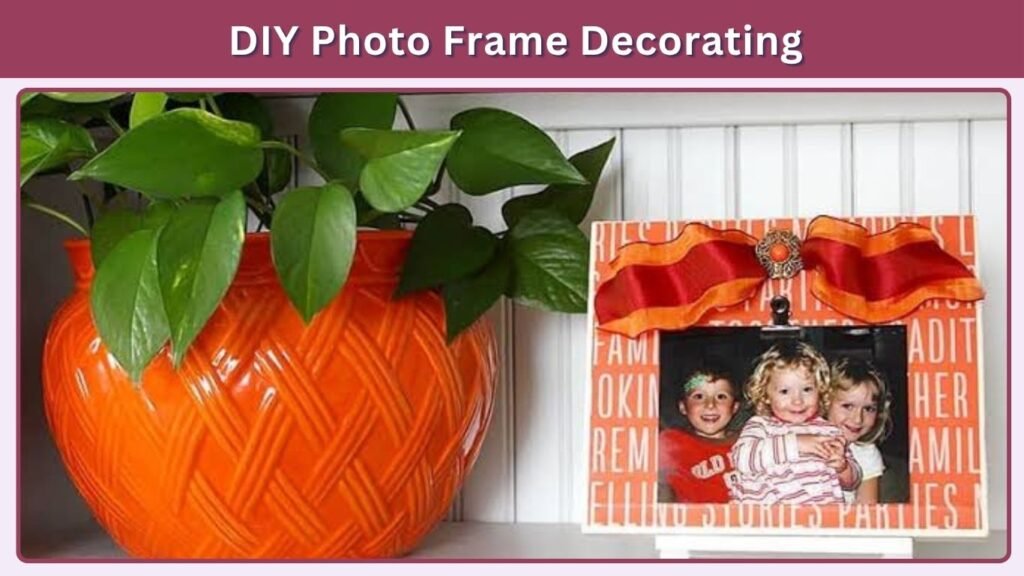
DIY Photo Frame Decorating is a fun and creative arts and crafts activity that allows kids to personalize picture frames using colorful paper, stickers, paint, and other decorative materials. Children can transform ordinary frames into unique handmade decorations for displaying family photos, favorite memories, or artwork. This hands-on project encourages creativity, artistic expression, and fine motor development. It is perfect for preschoolers, elementary school children, and homemade gift-making activities.
Materials Needed
- Plain Wooden or Cardboard Frame: For creating the photo frame.
- Washable Paint: For adding colorful designs.
- Paintbrushes: For decorating the frame.
- Colored Construction Paper: For making decorative shapes.
- Non-Toxic Glue: For attaching decorations.
- Stickers: For adding stars, flowers, and other patterns.
- Markers: For writing names or messages.
How to Decorate a DIY Photo Frame
Start by choosing a plain cardboard or wooden photo frame. Place it on a protected work surface and encourage children to select their favorite colors and decorations.Paint the frame using bright colors or create interesting patterns with markers. Allow the paint to dry completely before adding other materials.
Cut small hearts, flowers, stars, or geometric shapes from construction paper and attach them around the frame using glue.Children can personalize their frames by writing their names, adding stickers, or creating colorful borders.Once all decorations are dry, insert a favorite photograph or drawing. Display the finished frame on a shelf or give it as a handmade gift.
Learning Benefits
Decorating photo frames helps children develop creativity, fine motor skills, and hand-eye coordination. They practice selecting colors, arranging shapes, and creating decorative patterns. This activity also encourages personal expression, concentration, and appreciation for family memories while developing basic design skills.
20. Recycled Bottle Art Crafts
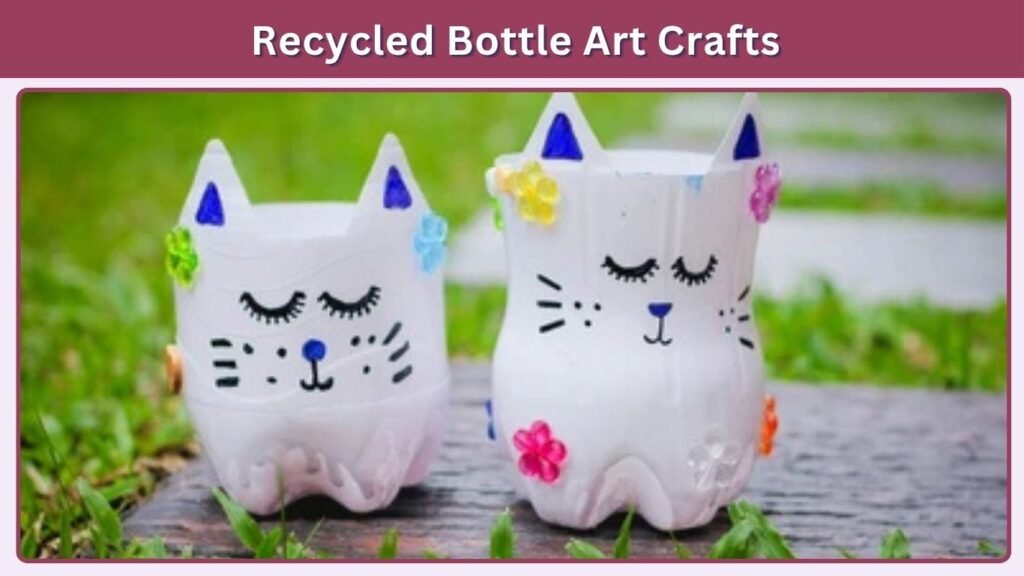
Recycled Bottle Art Crafts are creative and environmentally friendly activities that teach kids how to transform empty plastic bottles into colorful artwork. Children can make flower vases, pencil holders, animal figures, and decorative containers using recycled bottles and simple craft supplies. This hands-on project encourages imagination, artistic expression, and environmental awareness while introducing the importance of reducing waste. It is an excellent activity for elementary school children, classroom recycling projects, and creative family craft sessions.
Materials Needed
- Empty Plastic Bottles: For creating different craft projects.
- Washable Paint: For decorating bottle surfaces.
- Paintbrushes: For applying colors and patterns.
- Colored Construction Paper: For creating decorative features.
- Non-Toxic Glue: For attaching paper decorations.
- Child-Safe Scissors: For cutting paper shapes.
- Markers: For drawing designs and adding details.
How to Make Recycled Bottle Art Crafts
Begin by collecting empty plastic bottles and washing them thoroughly. Remove the labels and allow the bottles to dry completely.Choose a simple craft project, such as a colorful flower vase or pencil holder. An adult should cut the bottle to the appropriate height and cover any cut edges to prevent injuries.
Encourage children to paint the outside of the bottle using bright colors and creative patterns. Allow the paint to dry before adding decorations.Cut flowers, leaves, animal ears, or other shapes from construction paper and attach them using glue.Children can also add stickers, draw patterns, or create imaginative characters.Once completed, use the recycled bottle craft as a lightweight decoration, pencil holder, or flower container.
Learning Benefits
Recycled Bottle Art Crafts encourage creativity, problem-solving, and fine motor development. Children practice painting, decorating, and transforming ordinary objects into useful items. The activity also introduces environmental responsibility, recycling concepts, and the importance of reusing materials to reduce household waste.
FAQs
1. What are the best arts and crafts activities for kids?
The best arts and crafts activities for kids include paper plate animals, DIY paper flowers, rock painting, friendship bracelets, and popsicle stick crafts. These projects encourage creativity, improve fine motor skills, and provide fun learning experiences using simple, affordable materials.
2. What are some easy arts and crafts for preschoolers?
Easy arts and crafts for preschoolers include handprint painting, cotton ball cloud crafts, paper plate animals, and rainbow crafts. These activities use simple materials and age-appropriate techniques to develop creativity, color recognition, sensory awareness, and hand-eye coordination with adult supervision.
3. How can I do arts and crafts with kids at home?
You can organize arts and crafts at home using everyday materials such as paper, cardboard, glue, paint, and recycled containers. Choose age-appropriate projects, prepare a safe workspace, and encourage children to explore their creativity through painting, cutting, folding, and decorating.
4. What are the benefits of arts and crafts for children?
Arts and crafts help children develop fine motor skills, creativity, concentration, and problem-solving abilities. Hands-on projects also encourage self-expression, improve hand-eye coordination, and strengthen confidence. Group crafting activities can promote teamwork, communication, and positive social interaction among children.
5. What inexpensive materials can be used for kids’ crafts?
Affordable craft materials include construction paper, cardboard boxes, toilet paper rolls, popsicle sticks, cotton balls, and empty plastic bottles. Recycled household items are especially useful for budget-friendly projects, helping children create imaginative artwork while learning about recycling and reducing waste.
